
Lawn Sprinkler Wiring Problems and Solutions
Sprinkler Wiring Troubles That Are (Sometimes) Easy to Repair
- Broken or damaged wires are the most common cause of zone failures; often from mowers, rodents, or soil movement.
- Cracked conduit near the controller lets moisture in, causing corrosion that spreads underground.
- Loose, poor, or corroded connections in valve boxes cause intermittent or multiple zone failures.
- Short circuits result from damaged insulation, water intrusion, or failed solenoids and can blow fuses.
- Bad valve solenoids cause single-zone failures; test resistance—below about 20 ohms indicates replacement.
- Always check wiring and terminals before replacing a controller; loose or damaged common wire often mimics controller faults.
- Bury wire 6–12 inches, use rigid conduit near the controller, and direct-burial waterproof connectors to prevent future issues.
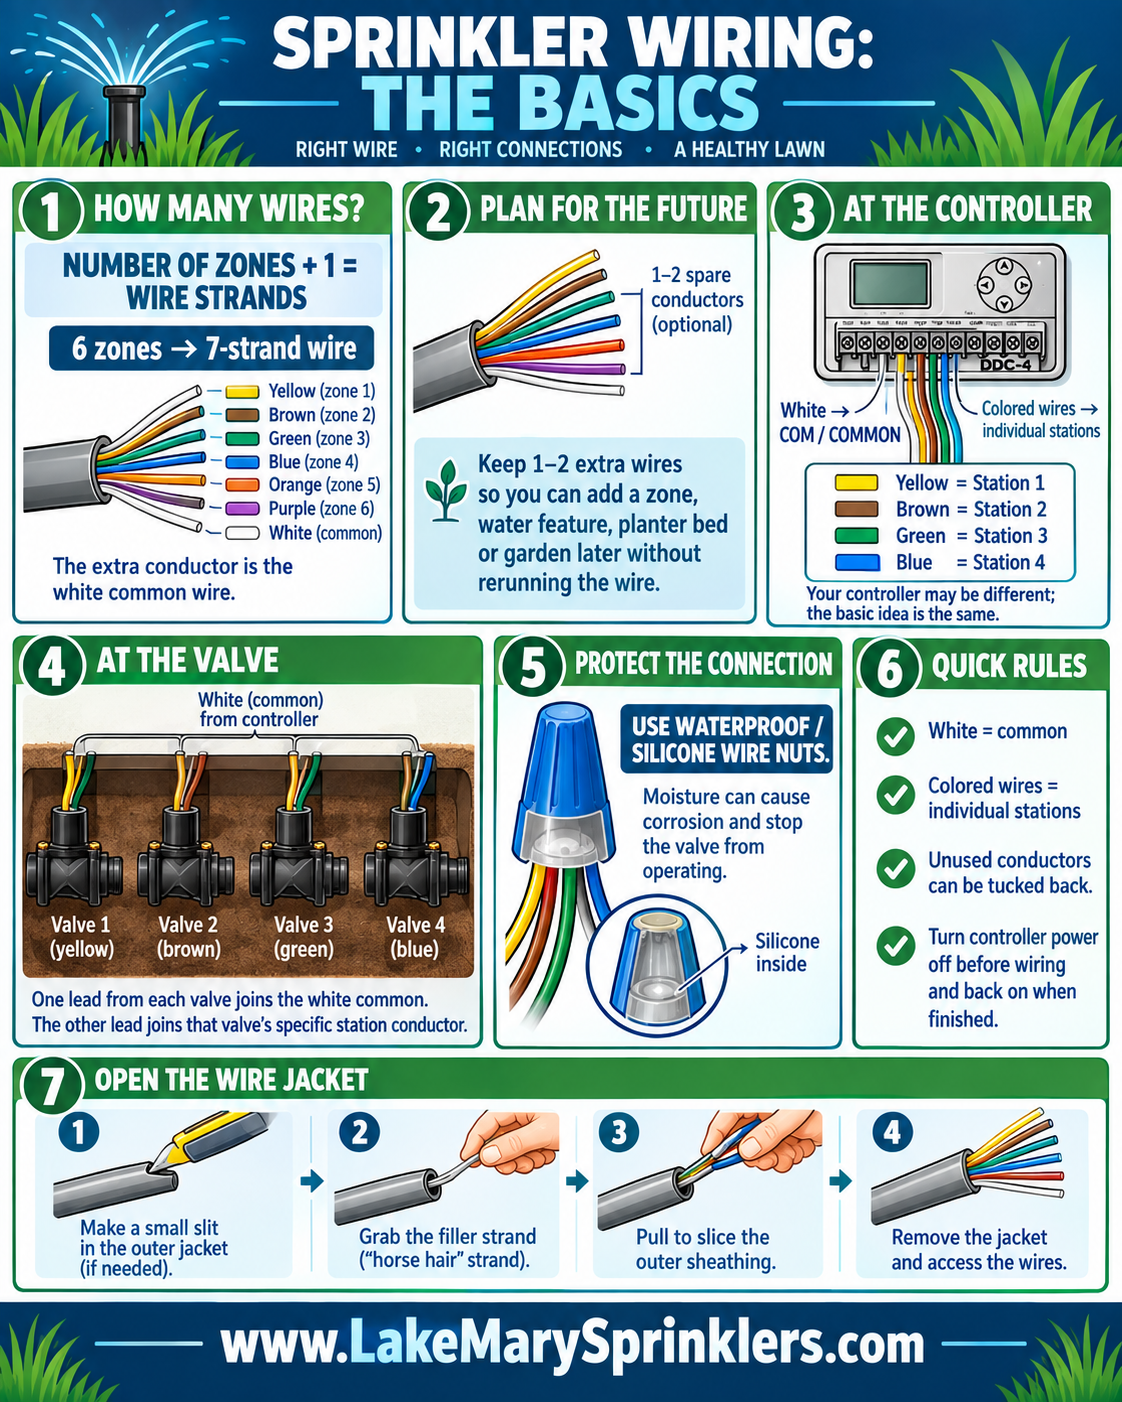
Damage to wiring will occur wherever the wire is bent or flexed.
Your signs include:
There is no water flow in a zone
A zone occasionally works; after a while, there is no longer any flow
Controller shows that a zone is on, however there is no water to the sprinklers
Causes of wire breaks:
Wires are damaged by lawn mowers or other equipment
Weed whackers crack the conduit where it connects to the controller
Dogs or animals gnaw at exposed wiring
Ground settling pushes the wire away from its anchor point
UV rays damage the plastic coating on the wiring; eventually this exposes the wiring beneath.
Wire Cracks Near The Controller
This is a sneaky one. Damage to the conduit where the wiring comes up from the earth is a very common source of problems. Weed whackers and other equipment damage the conduit.
Why This Matters
Water seeps into the conduit
Water flows down the wiring
Inside the wiring, corrosion develops
Even though the break is above ground, the damage is likely to continue underground.
Poor or Loose, Or Corroded Wiring Connections
Many wiring troubles reside in the valve boxes.
Your Signs
Only one zone operates, and others do not.
Randomly, a zone activates.
Multiple zones malfunction
Reasons
Wires are twisted together without being properly connected
Underground wire nuts are used to connect wires
Moisture penetrates the connection
Over time, corrosion develops.
Unless silicone-filled, direct burial connectors were installed, failure is inevitable.
Short Circuits
A short circuit occurs when electricity finds a path it should not take that has less resistance than the circuit calls for.
Common Causes Of Irrigation Wiring Short Circuits
Controller turns off
Fuses continually blow
Smell of smoke appears when the transformer is involved
Causes
Damaged wiring insulation
Wires touch underground
Water within cracked wiring
Faulty solenoids
Important
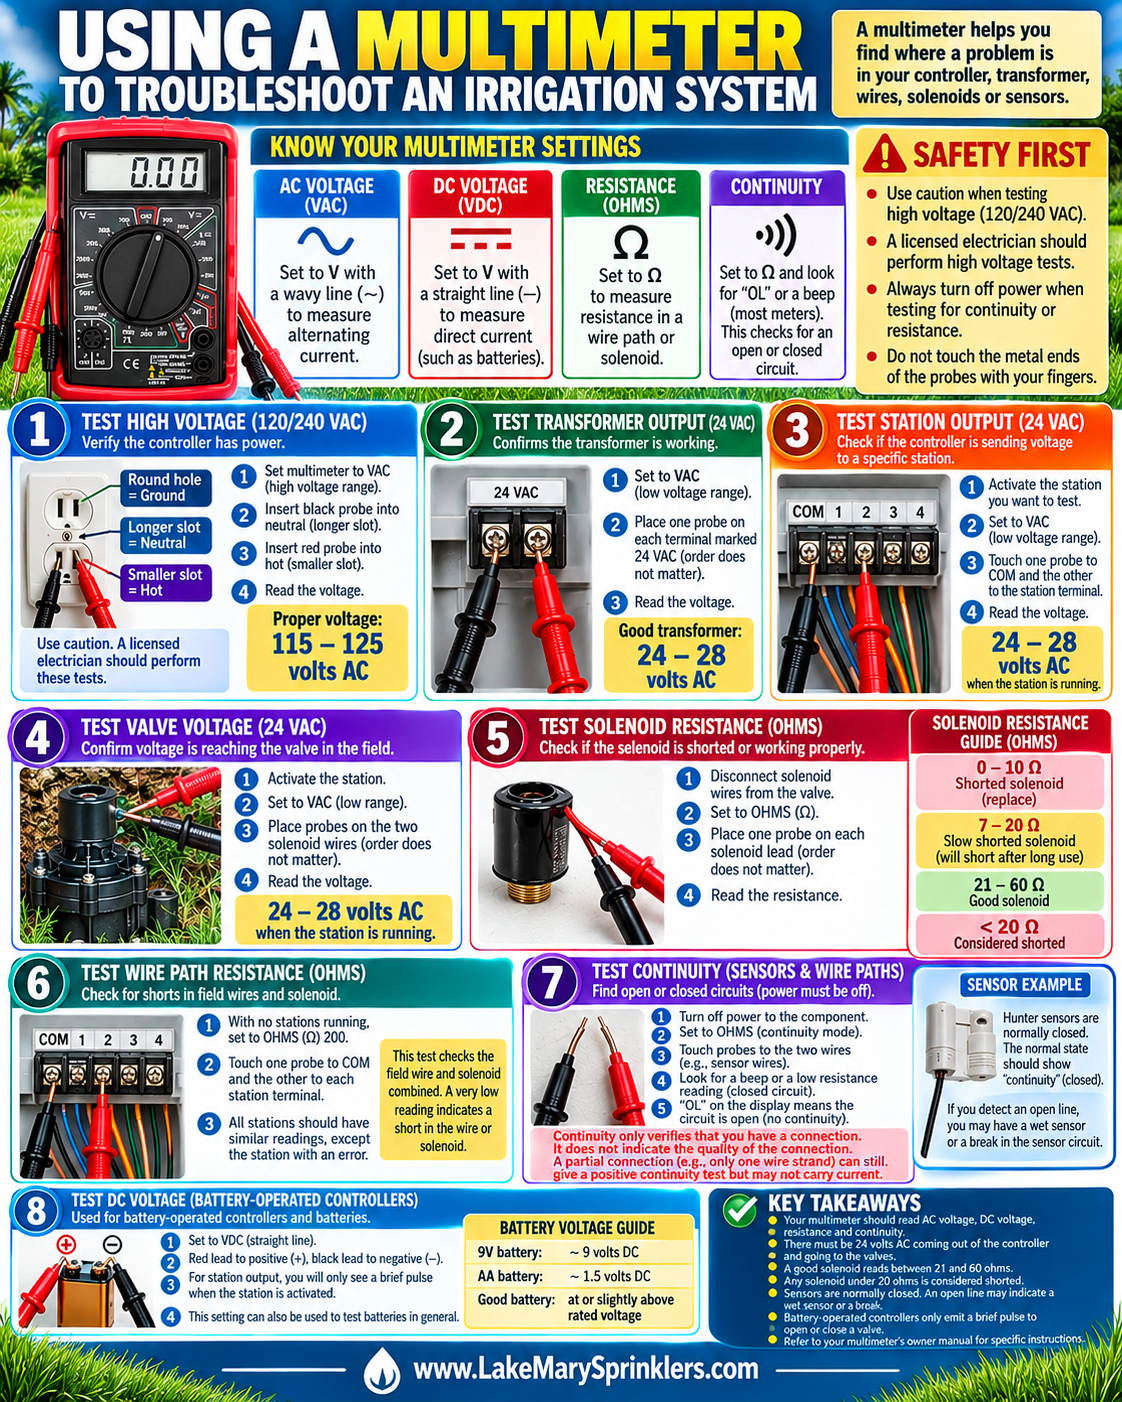
A solenoid is normally read at 20 ohms to 60 ohms. A lower reading generally indicates internal solenoid failure.
Faulty Solenoids
Solenoids are subject to failure. It’s normal.
What You’ll See
Zone doesn’t operate
All other areas function well
Solenoids fail from:
Age
Heating
Internal shorts
Water getting into the solenoids
They’re little, but they control everything.
Troubles With Controller Wiring
Smart controllers are occasionally the culprit when actual wiring issues exist.
Your Signs
Zones cannot activate
Programming cannot initiate
Screen freezes or goes back to default settings
Causes
Terminal wires are loose
Damaged common wire
Problems with the power supply
Older versions of smart controller software
Always inspect wiring prior to replacing the controller.
Local Failures In Zones
When only one or two zones experience failures, it is extremely probable that the problem exists in that area.
Why
Near that valve, a broken wire
Solenoid Failure
Inadequate splice in the valve box
This is among the simpler problems to identify if you take your time and isolate it.
Step-by-Step Troubleshooting Guide to Irrigation Wiring Problems
Step 1: Shut Down Power And Look For Visible Damage
Begin with the obvious.
Verify
Exposed wiring
Cracked conduit
Connections that are loose
Valve boxes contain standing water
If it seems to be damaged, it probably is.
Step 2: Test Wiring Continuity
Utilize a multimeter.
How to Utilize a Multimeter
Disconnect the zone wire at the controller
Rontinuity between the common wire to the to the valve
No continuity = broken wire/ bad connection
This informs you whether electricity can pass through the wire.
Step 3: Examine Each Valve Box
Don’t overlook this stage.
What to Search For
Corroded wire
Insulation that has deteriorated
Incorrect connectors
Standing water in the valve box
If you observe corrosion, remove it and begin again.
Step 4: Look for Short Circuits
Using an ohmmeter
Desirable Range
Ohms 20 – 60
Outside that range, it is likely that:
Damaged wire
Solenoid Malfunction
Step 5: Examine Solenoids Separately
Disconnect solenoid wires and measure resistance at the valve
Reading too low/high = must replace
Step 6: Verify The Controller
Before digging, ensure that:
Power is present
Reset the controller
Turn on each zone manually
It is quite typical for systems to “stop functioning” as a result of basic controller-related problems.
How to Resolve Common Sprinkler Wiring Problems
Repairing Broken Wires
Remove the damaged portion of the wire
Insert the new wire into the remaining part
Use direct burial connectors
Buried 6 – 12 inches
Repairing Poor or Loose, Or Corroded Wiring Connections
Remove the corroded wiring
Clean and strip the new copper wiring
Use silicon filled wire nuts or apply dielectric grease
Repairing Short Circuits
Separate the wires
Restore the wiring insulation
Replace the damaged portions completely
Temporary solutions rarely endure.
Replacing a Faulty Solenoid
Shut off the water
Take the solenoid apart
Put in a new one
Before putting the valve box back together, make sure it functions
Repairing the Smart Controller
Secure the terminal wires
Remove and/or replace damaged wires
Upgrade the controller’s software
Replace the controller if required
Prevention of Future Sprinkler Wiring Problems
Correct Burying of Wires
6 – 12 inches
Avoid shallow borders
Protect Conduit
Hard conduit at the controller
Secure it so that it will not move
Use Direct-Burial Only. Never use standard wire nuts
Every Year or So, Perform Seasonal Inspection
Open the valve boxes
Examine for water or corrosion

Q & A
Q 1: What are the most frequent sprinkler wiring troubles?
Broken wires, poor connections, bad solenoids, short circuits and troubles with smart controller wiring are the most common problems.
Q 2: How would I know if a sprinkler wire is damaged?
A zone never starts
Intermittent operation of a zone
Activity at the controller, yet none in the yard.
Q 3: Can lawn equipment damage sprinkler wiring?
Yes. Lawn mowers, edgers, and weed whackers frequently damage shallow wiring and conduit.
Q 4: What is the reason for sprinkler wiring to corrode?
Moisture penetrating the connections, incorrect connectors, and cracking of the conduit permit corrosion to develop.
Q 5: How can I test sprinkler wiring using a multimeter?
Remove the zone wire at the controller
Test for continuity between the controller and the valve
No continuity = broken wire
This will tell you whether electricity can travel along the wire.
Q 6: What ohm reading should a sprinkler solenoid exhibit?
Typically, a healthy solenoid will exhibit an ohm reading of 20 ohms or greater.
Q 7: What causes short circuits in sprinkler systems?
Damaged insulation, moisture, underground contact between wires, or failed solenoids.
Q 8: Is a bad solenoid capable of damaging wiring?
Yes. Failed solenoids can create shorts that harm wiring and controllers.
Q 9: How deep should sprinkler wiring be buried?
Between 6 and 12 inches to safeguard it from injury.
Q 10: Must sprinkler wiring be replaced periodically?
No. Unless damaged or creating repeated failures, wiring need only be replaced as needed.
Q 11: Can I perform sprinkler wiring repairs on my own?
Possible minor repairs for many home owners. Repeated failures or complex difficulties are frequently best handled by a skilled irrigation repair technician.
Q 12: Why does only one sprinkler zone cease operating?
This is typically indicative of a localized issue such as a broken wire, malfunctioning solenoid, or bad splice.
Q 13: What tools are required to make sprinkler wiring repairs?
Multimeter, wire strippers, screwdrivers, waterproof connectors, and wire brush.
Q 14: Can moisture in valve boxes produce wiring troubles?
Yes. Water accumulation in the valve box causes rapid corrosion and raises the risk of short circuits.
Q 15: Are smart controllers more prone to wiring issues?
Not really, but they are significantly more sensitive to wiring faults and shorts.
Q 16: How frequently must sprinkler wiring be evaluated?
Once annually, preferably just before the peak watering season.
Q 17: What is referred to as a “common” wire in a sprinkler system?
The common wire is linked to every valve and provides the circuit for all zones. All zones will fail if the common wire fails. The common is generally white, but not always. At the least it should be a different color than the other wires
Q 18: Can rodents destroy sprinkler wiring?
Yes. Rodents commonly nibble on exposed or shallow wiring.
Q 19: What is a “direct burial” wire connector?
An underwater connector for electrical connections made specifically for underground connections.
Q 20: When should I replace my sprinkler controller?
If wiring and solenoids test fine, but problems continue to emerge, controller replacement may be necessary. You can use a volt meter to test the outgoing voltage. It should be 26 volts or maybe a little higher
Q 21: What is a “doubler”?
A doubler is a specific type of switch intended for activating multiple valves using a single wire.
Final Thoughts
While it can appear challenging to troubleshoot irrigation wiring problems at first, when you proceed methodically and address them in sequence, most issues are relatively straightforward to diagnose.
First, look at the wiring.
Next, check for loose connections.
Following that, evaluate the solenoids individually.
Finally, rule out the controller.
The majority of systems do not collapse at the same time. They provide warning signals. Address those issues quickly, and the repairs remain straightforward. There is additional information available regarding DIY lawn sprinkler troubleshooting.
Most systems don’t fail all at once. They give warning signs. Catch them early, and repairs stay simple. You can find more DIY lawn sprinkler problem solving here and sprinkler repair videos here