
Lawn Irrigation Contractor Services
For the TL;DR types this is what I do:
Sprinkler Repair and Troubleshooting
- System Leak Detection and Repair
- Sprinkler Head Repair Services
- Irrigation Pipe and Valve Repairs
- Smart Irrigation Controllers
- Sprinkler Timer Services
- Water Pressure Management
- Sprinkler System Upgrades
- Sprinkler Electrical Troubleshooting.
- Drip Irrigation Repair
- Centrifugal Pump Troubleshooting
- Irrigation System Inspections
- Adjustments and Optimization
- Rain Sensor Installation
I do NOT do new irrigation system installs
The longer explanation:
Things go wrong with irrigation systems all the time. Sprinkler heads break, valves leak, controllers go bad, etc. With a lawn irrigation contractor like me who is familiar with your system and has access to the parts and supplies needed to repair it, you will be able to get it fixed quickly and efficiently.
Maintenance of Your Irrigation System (Just Like Car Maintenance)

Your irrigation system will have problems too; a lot of people forget their sprinklers are like a car that needs routine maintenance – i.e., oil changed, etc. Don’t wait until a few small problems grow into bigger issues, which cost thousands of dollars to repair. Broken pipes, flooded lawns, and big water bills can be avoided by having your system checked regularly.
Regular checks help find issues before they become expensive to fix. What do these regular checks involve? When I come to your house, I will walk through youryard as your irrigation system is running to check every single head – are they spraying the right area? Is there a break in any of the heads? I will then run tests on your controller to verify it was properly set-up.
Catching problems now will save you money compared to emergency repairs down the road. Most repairs happen because of a few reasons. Mower blades cut sprinkler heads daily (it’s a simple fix). The problem with leaky valves is usually a little harder to diagnose but you can tell it has happened when you notice a patch in your lawn that always seems to stay wet. Nozzles clog up easily and cause uneven watering. If a pipe in your irrigation system develops cracks, the pipe will have to be dug up and replaced. The good news is most of the time a repair job can be completed quickly if you take care of it before it becomes a larger issue.
Basic Digital Sprinkler Controllers
A basic digital sprinkler controller is a replacement for the old timers which were a mechanical device with a dial to turn a pin (or two) and a button or switch to turn the valve on and off. A basic digital controller will give you a screen with buttons and/or a keypad. It is able to store your watering schedule in memory so you do not lose your watering schedule in case of a power outage. Much easier to program and more reliable than its mechanical predecessor. Basic digital controllers allow you to create multiple programs. For example, one program could provide enough water for your lawn three times a week and another program provides enough water for your flowerbeds twice a week. In addition, most basic digital controllers will include a “pause” function that allows you to stop watering entirely without losing your entire watering schedule. This comes in very handy during periods of prolonged rainfall. Many basic digital controllers will include a “seasonal adjust” option as well. During the Spring and Fall months, reduce the amount of water provided by 30%, then increase the amount of water in the summer months.
Mid-range digital controllers will include additional features such as a “cycle and soak” function. With this feature, the controller will water for five minutes and then pause for a period of time before watering again for five minutes, etc. This helps prevent excessive amounts of water from running off during heavy rainstorms on slopes or clay soils. Additionally, mid-range controllers typically include a “rain delay” function allowing you to skip watering for several days at a time.
High-end digital controllers will include connectivity to Wi-Fi. As such, they are able to receive current weather conditions and adjust watering accordingly.
The “Smart” Irrigation Controller Systems
Smart irrigation systems are simply smart irrigation controllers with the ability to connect to the Internet, get the current weather conditions and make decisions to optimize watering for your yard. Smart irrigation systems are probably the greatest advance in irrigation efficiency since automatic irrigation systems were developed. Once installed, these systems will continue to automatically monitor your yard and make daily adjustments in the amounts of water that will be applied to your lawn based upon the weather conditions that occurred over night. These systems can receive weather data from a variety of sources including local weather stations, national weather service reports, government reports as well as other weather-related websites. The systems will take into account such factors as temperature, humidity, wind speed, sun light and precipitation forecasts in order to estimate how much water was lost through evapotranspiration (the amount of water used by plants plus the amount of water evaporated from the soil) during the previous day. Based on this calculation the smart irrigation controller will then determine how long each of the zones should be irrigated to replace the amount of water lost through evapotranspiration.

In order to provide an accurate reading of the various factors that affect how much water is needed for each zone, the homeowner or landscaper needs to enter a number of variables for their property. Some of the variables include the type of soil (sand, clay, loam), the type of plant material in each zone, the amount of sunlight each zone receives, the slope of the land, and the type of sprinkler being utilized. Most smart irrigation controllers will guide the user through a simple process for collecting this data. The data collected allows the smart irrigation controller to calculate the correct amount of water needed for the individual zone. The smart irrigation controller will then adjust the amount of time each zone is allowed to operate automatically every day.
In addition to adjusting the amount of time each zone is operated based on the amount of water needed for each zone, the smart irrigation controller will also consider the weather. If rain has fallen in the previous 24 hours, the smart irrigation controller will skip watering for that day.
Likewise, if hot dry weather is forecasted, the smart irrigation controller may allow additional watering to prevent damage to the plants due to lack of moisture. Conversely, if cool humid weather is forecasted, the smart irrigation controller will reduce the amount of time each zone operates to avoid overwatering. The homeowner does not need to perform any actions to accomplish this; the smart irrigation controller simply makes the necessary adjustments to the operation of the irrigation system.
One of the benefits of utilizing a smart irrigation system is the remote access capabilities provided through smartphone apps. Traveling and want to make changes to your irrigation schedule? Simply pull out your smartphone and make the changes from your hotel room. Working with a landscaper and want to temporarily pause the irrigation system? Simply pull out your smartphone and click pause. Need to view the historical usage of your irrigation system? Simply check the app. For many homeowners, the convenience offered by a smartphone app is worth the cost of upgrading to a smart irrigation controller.
Water savings realized by installing a smart irrigation controller are typically between 30% to 50% compared to a standard timer. Savings of this magnitude can equate to significant financial savings for many homeowners. The payback period of a smart irrigation controller is generally 1 to 3 years depending upon the size of the yard and the homeowner’s water costs. Once the payback period is met, all of the water saved is simply pure profit.
Irrigation Design
Unfortunately I sometimes have to deliver the bad news: Sorry, but your irrigation is so badly designed that it is not upgradable. You need to replace it with one that is better designed. This is what takes an irrigation system from working well to working badly – wasting water with brown spots. Irrigation design occurs prior to beginning any digging and represents the planning phase of developing a customized irrigation system designed specifically for your yard.

When designing an irrigation system, a designer has to evaluate your entire property including; the layout, dimensions, location of plants (and/or future plants), water pressure and flow, soil composition and sun/shade patterns. At this point, they’ve gathered enough information to develop a system which will match your specific properties’ conditions. Next, the designer develops the actual irrigation design. The designer divides your property into zones depending on plant species, sun exposure and soil.
They then determine the required pipe diameter to provide the necessary pressure. The designer selects the most suitable sprinkler head(s) and places them accordingly to achieve complete coverage. The designer also determines where the valves will be placed as well as the placement of the controller. The designer documents every aspect of the design in a plan drawing.
Why would you ever want to spend money on design? Mistakes can be very expensive to correct. There are too few heads, so there are dry spots. The wrong pipe size causes low pressure. If the zones are improperly designed, some areas receive too much water and other areas receive too little water. Good design eliminates these problems. It provides equal coverage, provides the right amount of water for each plant species, and uses the least amount of water possible. The cost of design pays for itself by providing a superior result and reducing your water bill.
Here is more on the subject https://edis.ifas.ufl.edu/topics/lawn_and_garden_care_irrigation
Irrigation Wiring Problems
The most common issue with Irrigation Systems (in addition to faulty controllers) is problems with the wiring system. All of the irrigation components in your yard connect to your controller via wiring. If there is a wiring failure, all of your zones will either not turn on or turn off randomly (both are unacceptable). The most common causes of wiring failures are digging into wires, corrosion at connections due to moisture, or rodent damage to the wires.
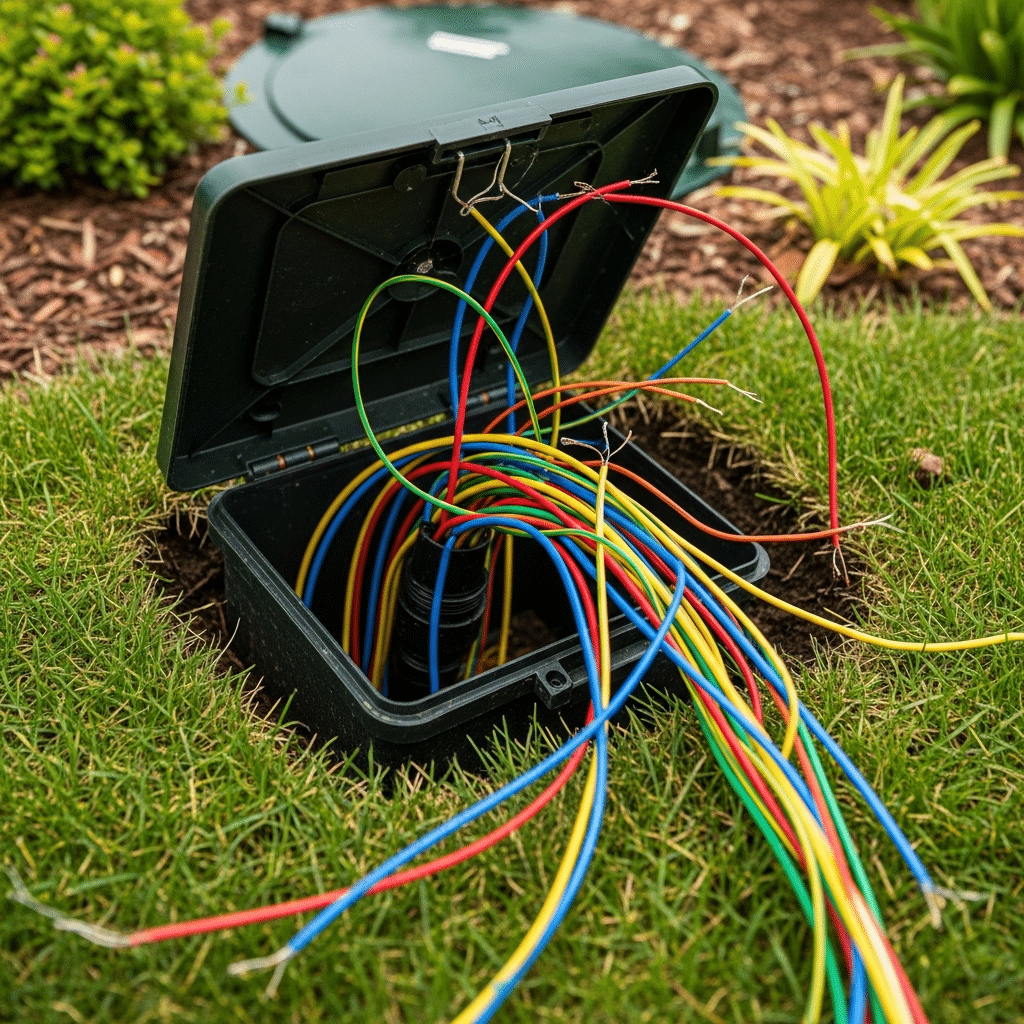
How can you tell if the issue is related to the wiring?
* Your controller displays an error message.
* You push the zone button, and nothing happens.
* A zone continuously operates whether or not your controller is turned “on” (although rare, it’s usually the valve.)
* Sometimes, only some zones work while other zones do not – This typically indicates individual wire issues as opposed to the controller itself failing.
In order to find out what the problem is, you will need to test each component of your irrigation system. To determine if the problem lies with the wiring, use amultimeter to measure the continuity between the controller and the valve. If the ohm meter reading is in the hundreds or thousands, this could mean that the wire has been broken somewhere along its route or the solenoid is bad. However, if there is a connection, but the valve does not operate, then the issue may be a problem with the valve, and not the wiring.
If you have a buried wire that has broken, finding the exact location of the break requires either digging along the length of the wire until you reach the break, or by using a wire tracing tool to locate the break in the wire.
To repair the wiring, you will either need to splice in a new section of wire, or run an entirely new wire from the controller to the valve. In buried irrigation applications, the standard wire connector (wire nut) will not hold up. Instead, you should use waterproof wire connectors specifically designed for irrigation use. It is also very important to wrap the repaired area of the wiring well to prevent future failures, and to properly cover the entire area after repair to protect it from additional water exposure.
Some installers will also lay down an extra (spare) wire during the installation process. Then, when a wire is damaged, you simply remove the old wire and replace it with the new wire, eliminating the need to dig and making repairs much easier.
Sprinkler Heads

The sprinkler head is what you see that puts the water onto your lawn. It pops up, sprays or rotates with the flow of water, and then drops back down. There are many types of sprinkler heads that perform many functions. Choosing the correct sprinkler head will make a significant impact on how much of your lawn gets covered and how efficiently you can use water.
Spray Heads
Spray heads emit a fixed pattern of water (a fan-shaped spray). They are ideal for smaller to medium sized lawns, corner applications and for tighter spaces. Because of their high velocity of water application they have shorter run times, generally 20 minutes in the sun.
The spray nozzle is an element of the spray head; it sits on top of the barrel and defines how far apart and at what angle the water will be sprayed from the spray head as well as how fast the water will exit the spraying head. The same spray head body and different spray nozzles = greatly different performance. Therefore, choosing the correct spray nozzle is important.
Standard Spray Nozzles will spray water in a predetermined fan pattern. These spray nozzles are generally color coded by fan diameter – 8′, 10′, 12′ and 15′. They matched precipitation rate nozzles they provide the same amount of water whether the pattern is 25%, 50% or 100% of a circle. As an example, a 90-degree 15-foot nozzle emits one gallon per minute, a 360-degree nozzle will emit 4 GPM. With the capability to provide the same amount of water regardless of the pattern being used in a zone, this allows you to use a combination of quarter, half and full circle spray patterns in a single zone without having to create “wet” and “dry” areas within a zone.
Rotor Heads
Rotor heads are designed to rotate in a circular motion, emitting water in all directions at an angle from the direction of rotation. This type of sprinkler head provides efficient watering of large open areas. These rotor heads provide slow rates of water application, giving plants sufficient time to absorb the water as well as preventing surface water runoff. Rotor heads are typically the most effective type of sprinkler heads to be used on larger lawns. Although rotor heads are more expensive than spray heads, they provide a wider area of coverage. Just as with spray heads, rotors should be precipitation matched.
Multi-Stream Rotators
Multi-stream rotators are the latest generation of sprinkler heads. They are compact like spray heads; however, they rotate like rotor heads. Multi-stream rotators use approximately 50% less water per minute than spray heads, and cover similar areas of lawn as spray heads. Due to their ability to cover a wide area of lawn with less water, multi-stream rotators are rapidly becoming the preferred sprinkler head type for new residential irrigation systems. Although the initial cost of installing a multi-stream rotator is greater than that of a spray head, the long-term water savings will pay back the additional cost very quickly. Also, multi-stream rotators operate better in windy conditions than spray heads.
Although I am a fan of multi-streamed nozzles, is not because they lead to less run off due to lesser precipitation rates (cyclic scheduling can do the same thing ), it is because they can help by retrofitting low pressure spray zones designed at too high of available volume. It also is an easier matching precipitation fix on zones with mixed rotors and sprays.
Repairing PVC Pipes
Your PVC pipes provide the connection for your irrigation system from your water line, through your valves, to each sprinkler head. A ruptured pipe will result inpoor distribution due to reduced water pressure and/or saturated soil, or total loss of function in that zone. Ruptures can occur due to various factors such as: cold weather causing the pipe to rupture; settling of the soil around the pipe; roots growing into the pipe; and individuals digging holes without first locating buried lines.
How Do I Know If My Pipe Has Ruptured?
The most evident indicator of a rupture needing PVC repair is the presence of bubbling water at the surface where your pipe has burst during operation of the irrigation system. Although less apparent are: wet areas remaining wet for an extended period of time after water was last applied; reduced water pressure in specific zones; and increased readings on your water meter while no irrigation system is in operation.

Sometimes the Difficult Part of Repairing PVC Pipes Is Locating The Damage
Locating the area of the damaged PVC pipe can be the most difficult part of the repair process. In some cases, it is necessary to create exploratory trenches following the path of the PVC pipe until the damaged area is located. There is also the option of hiring a professional who uses specialized equipment to locate leaks in irrigation systems.
I always use “blue” extra hot PVC cement and purple PVC primer specifically designed for use with PVC pipes.
Rain Sensors
Rain sensors will turn off your irrigation system when it rains. They are an extremely simple yet highly effective way of saving you money through reducing the amount of water used by your irrigation system. The “rainy day” watering issue many of us have experienced, especially concerning our neighbors who seem to be watering their lawn in the rain!
How Rain Sensors Work:
A rain sensor consists of a small component mounted somewhere exposed to the elements – normally at the top of a roof edge or fence. Once the sensor has collected sufficient rain (determined by you; commonly, 1/4 inch) it breaks the connection between your controller and valves. The system will remain OFF until the sensor has dried out, then normal watering can resume.

There are two basic types of rain sensors:
Expanding Disk Type Sensors: These sensors contain expanding corks disks that expand as they collect moisture. Very reliable and simple.
Electronic Type Sensors: These sensors operate using a tipping bucket design similar to those used in rain gauges. More accurate however, generally more expensive. For residential applications both styles function well.
Installing a Rain Sensor:
Installation is relatively straightforward. Mount the sensor so that it receives unobstructed rain. Run two wires from the sensor to your controller. Attach the sensor to the controller. Set the sensor threshold, which is the amount of rainfall required to activate the sensor. After installation, test the sensor by manually activating the sensor while one of your zones is running. Your zone should immediately shut down.
Many cities now mandate the installation of rain sensors on all new irrigation systems due to water restrictions. It seems logical that no one would want to irrigate their lawn during a storm. The cost of installing a rain sensor can range from $200+ for wired (depending on location) or $300+ for wireless. And the potential for water bill savings far exceeds these costs. Simply clean your rain sensor periodically to ensure the leaves and debris do not obstruct the sensor from collecting rain.
Sprinkler Valves
Each sprinkler zone has a single valve controlling water flow. The valve opens when the controller signals it to; water flows into the sprinklers. Controller ceases signaling, valve closes and water stops flowing into the sprinklers. It is common to have one valve per zone in residential systems; however, in commercial systems there may be multiple valves per zone.

Valves are located in the numerous “green” or “black” boxes throughout your lawn. Each box contains the irrigation valve body (the plumbing portion) and the solenoid (the electrical portion). The solenoid receives a signal from the controller and opens the valve to allow water to flow into the sprinklers. In addition to opening and closing the valve, some have a flow adjustment knob to allow you to fine tune how much water enters the sprinkler zone. There are a number of common problems that occur with sprinkler valves; these include leaking or “weeping” (dripping water from the valve to the heads), the valve fails to open (zone does not turn on), the valve fails to close (zone continues to run) and partial blockages from debris. Most of these problems stem from the diaphragm within the valve; the diaphragm is a rubber disc that deteriorates over time and needs to be replaced.
Replacing the diaphragm will fix most valve problems. Identifying and diagnosing valve problems is relatively easy. Zone won’t turn on? Check if the solenoid makes a “click” noise when you turn on that particular zone. No click at all may indicate wiring or solenoid problems. Solenoid clicks but no water comes through? Internal valve problem. Zone still running after the controller tells it to stop? Either stuck valve or debris underneath the diaphragm. Proper maintenance of your valves will help extend their lifespan. Do not allow grass to grow over the valve boxes as this will limit access to repair problems. A quality valve should last between 10-15 years while an inexpensive valve may only last 5 years. Replacing a valve will cost approximately $250-$300+, depending upon labor costs due to valve location.
Locating Sprinkler Valves
You’re not alone in being unable to locate sprinkler valves. Green or brown valve boxes are frequently covered by growing grass, mulch or settling dirt. Sometimes the valve box was never properly installed. Often, the owner of the home prior to you lost track of them. Either way, locating them is essential to making any repairs to your irrigation system.
The most common method of locating the valve is to follow the wire. By identifying which wire corresponds to which zone at the controller, you can follow the wire to the valve associated with that zone. Some irrigation systems have wire pathways visible due to trenches dug in the yard. Following the wire pathway from the controller towards the zone controlled by the specific valve will generally lead you to the location of the valve, which is typically at the beginning of the zone. However, this is usually a time consuming and laborious task.
The best way is using a wire tracking device. These tools work by sending a signal through the wire and receiving it with a hand-held device. While walking around the area of the suspected valve, point the device toward different areas until the signal is strongest. That is the location of your valve. This method is preferred by professionals because it works best.
Once you’ve identified the location of your valve, make sure to mark it in some manner. Place a stake nearby, attach a flag to the stake and take a photograph of the location with reference to some fixed landmark such as the corner of your house. Additionally, you can create a detailed drawing of your entire property with the locations of each valve marked. In the future, you will appreciate having this information readily available when repairs become necessary. And, be certain to remove enough grass or dirt to expose the valve box lid so that it can be easily accessed for repairs.
Conservation of Irrigation Water
The conservation of irrigation water https://edis.ifas.ufl.edu/publication/AE287 refers to using fewer resources to maintain the health of your plants. Using the term “conservation” does not mean allowing your yard to suffer. It is simply being smart with your water resources through better irrigation equipment, irrigation schedules, and the type of plants you choose to irrigate. Technology has greatly aided in the ability to conserve water.
An example is smart controllers which will automatically adjust based upon weather conditions. In addition, pressure regulated heads will greatly reduce misting and waste. Drip irrigation delivers water right to the root zone of plants, reducing the amount of evaporation as compared to sprinkler systems. Also, many modern smart controllers have a feature called soil moisture sensors which will automatically turn off the controller if there is enough moisture in the soil.
When older equipment is replaced, typically, water usage decreases by 30-50%. Scheduling is also a very important factor. Water your lawn and/or garden during the early morning hours when evaporation rates are at their lowest. Do not water your lawn or garden during the middle of the day when as much as 1/2 of the water may be lost to evaporation prior to reaching the ground. On sloped areas, water in cycles and soak the soil. This will help prevent runoff. Adjust your watering schedule throughout the year.
Maintenance also helps to conserve water. Leaks should be fixed immediately. A broken sprinkler head can waste 10 gallons or more gallons of water per minute. Replace worn out nozzles. Clean clogged emitters. Readjust sprinkler heads to avoid watering sidewalks, etc. These small tasks can add up to substantial water savings. Finally, choosing the right type of plants will also aid in conserving water. Plants that are native to the Central Florida area require significantly less water than plants that are exotics. Hydrozoning , https://www.swfwmd.state.fl.us/residents/water-conservation/irrigation/irrigation-design or grouping plants by their watering requirements, will enable you to provide your plants with the correct amount of water without either overwatering or underwatering them. Additionally, replace portions of your lawn with drought-tolerant landscaping. Grass is typically the thirstiest part of most landscapes. Many water districts also offer rebates for purchasing new efficient irrigation equipment or converting your existing landscaping to drought-tolerant plants. Contact your local water district to find out what incentives they offer.
Water Management
Water management involves controlling the amount of water applied to your landscape and when. Effective water management involves balancing the health of your plants, conserving water, saving you money, and protecting the environment. Essentially, water management is about making conscious decisions instead of simply turning on your sprinklers and hoping for the best. Start by determining your landscape’s needs. Different areas of your landscape require different amounts of water. Here is a guide on how long to water your grass.
For example, sunny lawns require significantly more water than shaded flower beds or mature trees. Divide your landscape into zones that contain similar watering requirements. Then, water each zone accordingly. Determine how much water you are actually using. Look at your water bills. Many water providers now report your usage online, or via mobile app. Any sudden spikes in your water usage could indicate leaks. Compare your usage to your neighbors with similar sized yards. If you are significantly higher than your neighbor, you likely have a problem.
Seasonal adjustments are also crucial to maintain your irrigation system. Most people program their system in the spring and then forget about it. That is wrong. Plants require dramatically less water in January than in May. Adjust your watering schedule every month or at least once a season. Many smart controllers have a seasonal adjustment knob that allows you to easily dial back your watering schedule to 60% in the fall and up to 100% in the summer.
Runoff is another issue you should manage. Water that runs off of your property into the street wastes water and pollutes storm drains by carrying fertilizers and pesticides. If you notice water running off of your property, your system is delivering water too quickly. To solve this issue, divide your run times into smaller cycles with rest periods in between. The soil needs time to absorb the water. Also, track rainfall and skip irrigation applications after heavy rainfall events. Without expensive sensors, you can still determine when to skip watering based on the amount of rainfall received. For example, if you receive 0.5 inches of rain, skip the next scheduled watering application. This single action alone can save you 20% of your water usage over the course of a season.
I often advise customers without smart controllers to just leave the timer off until your lawn needs water. How do you know the lawn needs water? Use the footprint test.
Backflow Prevention
Just so you know, I no longer replace backflows. Technically, only a licensed plumber or someone with a CBPT license can test and replace backflows. However, most lawn sprinkler contractors in Florida do it anyway. Personally, I find it a PITA so I no longer do them.

Why do you need it? To keep filthy irrigation water from being pulled through your home’s potable water lines when the irrigation pressure is greater than the home’s, a backflow prevention device is essential. Unless you have reclaim, all Central Florida cities have ordinances requiring backflow prevention on all irrigation systems, even from wells. For everyone’s safety; no homeowner wants contaminated, stagnant fertilizer filled irrigation water coming out of their kitchen sink faucet.
There are two ways for backflow to occur. The first is through a drop in pressure in the municipal water supply line (when a fire hydrant is opened, there is a leak in the city’s water mains, etc.) This creates a condition where the irrigation pipes’ pressure will be greater than the pressure at the irrigation outlet. Under these conditions, the contaminated water will enter your irrigation lines through the heads.
The way to prevent this is to install a backflow prevention valve, which is a device that allows water to only flow in one direction. There are several different types of backflow prevention valves, with Pressure Vacuum Breaker (PVB) and Reduced Pressure Zone (RPZ) being the most commonly used. PVBs are less expensive and easier to install and are generally sufficient for residential systems while RPZs are more complex and more expensive and are typically required for commercial or high hazard applications, although getting more common for homes. In either case, they need to be installed above grade in an area where they can be seen and maintained. Backflow laws are always changing so refer to your County cross connection control page.
Annual Testing and Repair
Maintenance of a backflow prevention device includes annual testing to ensure that the device is functioning as intended. Most jurisdictions require that this testing be performed by a certified tester to ensure that the test is done correctly and that the test results are accurate. The certified tester checks to make sure that the backflow prevention device does not allow backflow under varying pressure conditions. If the tester determines that the backflow prevention device failed the test, then repairs may be needed. The typical repair items for a failing backflow prevention device include worn seals and/or worn springs. Replacement parts for backflow prevention devices are readily available, however the equipment required to test the backflow prevention device is usually specialized and expensive.
Cost
Typically the cost of a replacing backflow prevention device and its installation starts at $500 and goes up depending on the type. Annual testing of the device can cost anywhere from $50-$100. Although it appears expensive, it is a small price to pay to protect your family’s drinking water. Additionally, in most jurisdictions, backflow prevention is a legal requirement and therefore cannot be avoided.
Low Volume Irrigation
Drip irrigation uses tubing and small dripper called emitters to deliver water directly into plant roots at a very slow rate. Drip systems are generally the most efficient way to irrigate, because they use between 30-50% less water than overhead irrigation systems. They work well for flower beds, vegetable gardens, shrub and tree areas; however, they are generally too slow to be used for lawn irrigation.
How does drip irrigation work? First, water flows from a hose through a main line of tubing that has been placed in the soil or on top of the soil. At intervals of about 12-18 inches, there will be small drippers attached to this tubing called emitters. These emitters release water very slowly, usually between 0.5 and 2 gallons of water per hour. This slow rate of water release minimizes the amount of water lost due to runoff, evaporation and ensures that the maximum amount of water reaches the plant roots.
A standard drip irrigation system consists of several parts including the main supply line which connects to your water source, a pressure regulator (since drip irrigation works best when the pressure is low), a filter (it is essential to have a filter to keep debris from clogging up the emitters), the distribution tubing (this can be either 1/2 or 3/4 inch), smaller tubing leading to each plant, and finally the emitters or the drip line itself.

To operate automatically, you would need to install a drip irrigation controller. Installing a drip irrigation system is not difficult to do, but it does require some thought and planning. The first step is to lay the main tubing along the rows of your plants or along the edge of your garden bed. Then, you will need to create smaller branches to lead to each plant. You can do this by running 1/4-inch tubing to each plant and attaching an emitter to the end of this tube. You should then stake the tubes down to ensure they don’t get moved around. Next, you should cover the entire area with mulch to help protect the tubing from the sun’s rays and to hide it from view. Before you install the emitters, flush the system to remove any debris that may have accumulated in the tubes.
The maintenance required for a drip irrigation system is fairly simple and relatively inexpensive. In order to maintain your system, you will periodically need to flush the system to remove sediment that may accumulate in the tubes. If you notice that one of your plants is drying out faster than the rest, you may need to check to see if one of the emitters is clogged. As time goes by, the tubing may become brittle from exposure to the sun. If you notice that the tubing is becoming brittle, you may want to consider replacing it. Also, you will need to adjust where you place the emitters as the plants grow. Finally, you will need to clean your filter monthly during peak growing season.
In terms of cost, a drip irrigation system is relatively inexpensive. Depending on the quality of the material, and how many emitters you decide to install per linear foot of tubing, the cost of can vary. On average, a typical flower bed system made of high-quality materials will cost around $300+ in materials alone. Labor charges will add additional cost to the project unless you plan on doing the installation yourself.
I do irrigation sprinkler repair service in Lake Mary, Sanford, Debary, Deltona, Longwood, Heathrow, Winter Springs, Oviedo, Sorrento, Casselberry, Fern Park, Winter Park, Forest City, Apopka, Altamonte Springs, Maitland, Wekiva Springs, Alaqua, and Sweetwater Club